

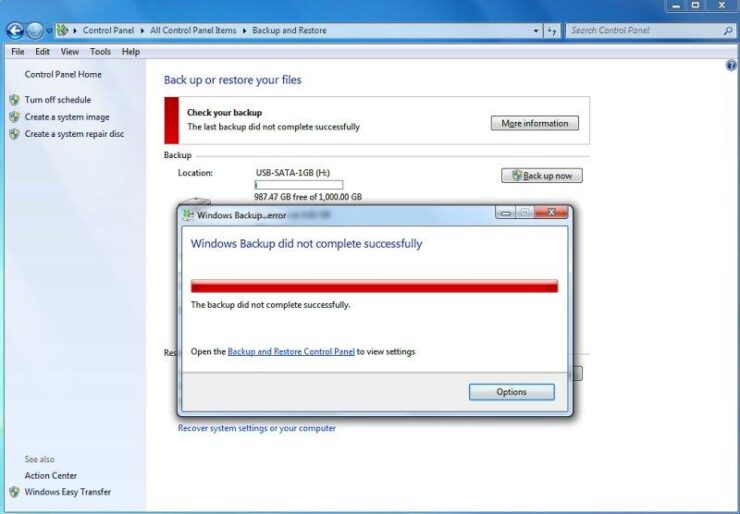
Backup and Restore failed and you receive the following error messages:
1) Windows Backup did not complete successfully.
Click the ‘Options’ button and the ‘Show Details’.
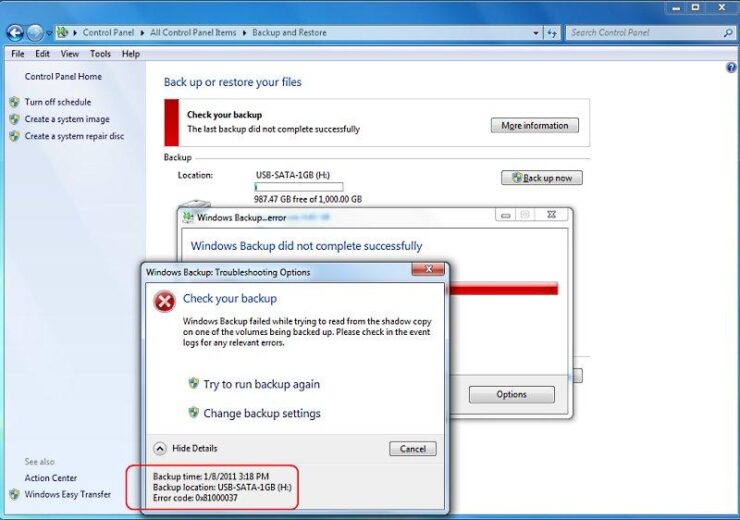
2) In the Windows Backup Troubleshooting Options windows you see the following: Windows Backup failed while trying to read from the shadow copy on the volumes being backed up. Please check in the event logs for any relevant errors. In the bottom left corner is the Backup time, Backup location and the Error code: 0x81000037.
The underlying problem:
Microsoft’s Security Essentials version 2:
Security Essentials includes ‘real-time protection’ to scan and detect viruses on your hard drive and will quarantine or an infected file, as a result the use of real time protection prevents the backup from completing.
More specifically, viruses that are not detected (for whatever reason) before a backup is started will be detected during the actual backup as is the case of Security Essential’s ‘real time protection’.
However, even though the ‘History’ log will show the infected file as being ‘Removed’ it is in fact only removed from the “VolumeShadowCopy” created during the backup process and not removed from the actual location of the hard disk. Therefore attempting another backup will only result in another backup failure.
It should be mentioned that each AV software product on the market (free or purchased) may have a different method of detecting and dealing with infected virus files. Therefore you must check your Anti-Virus software settings to insure that it not only removes the infected file but also does not interfere with the backup once it has started.
The solution:
Before starting a backup (manual or schedule) is to run a “Full” scan of your hard drive as a simple “Quick” scan may not detect the infected file depending on its location on your hard drive. Set the option as to what to do with infected files to ‘Remove’, do not quarantine the file as this may not be sufficient.
For scheduled backups set your Anti Virus software to perform a scheduled ‘Full System Scan’ prior to the start of a backup. To insure the scan completes before the backup is scheduled to start, measure the time it takes to run a “Full” scan of the Windows partition and any other partitions or drives that are included as part of the backup.
Then add at least an extra 33% to the time required to complete the scan (provides a buffer as over time you may add more personal data files thus lengthening the scan time) as a guide for delaying and setting the scheduled backup time.
Security Essentials Version 2 has a nice feature located in the ‘Settings’ tab that allows you to increase the amount of CPU usage allowed during a scan. Increasing the default of 50% to 70% can shorten the scan times.
Note: If you are still using an earlier version of Security Essentials, the upgrade to version 2 is free.
What about other Anti-Virus Products:
Norton NIS 2011:
Since I use Symantec’s Norton NIS 2011 on my personal computer, I though it was only fair to test NIS.
NIS 2011 did not cause the backup to fail even though “Real Time Protection” was enabled. Therefore the infected file was now part of the backup.
Kaspersky Internet Security 2011:
Kaspersky did not cause the backup to fail even though “Real Time Protection” was enabled. Therefore the infected file was now part of the backup.
Restoring a file that is infected:
Security Essentials: ‘Real Time Protection’ did not detect the infected file when using Backup and Restore’s ‘Restore my files’ option.
Interestingly if you attempt to restore the file by double clicking on the actual backup folder located on your external hard drive then real time protection does its job and flags the file.
Norton NIS 2011:
Recovering this file was not prevented nor detected. Again a “Quick” scan did not detect the presence of this file.
Kaspersky Internet Security 2011:
Recovering this file was not prevented nor detected.
Note: All the products mentioned will detect the presence of the infected file when performing a “Full” scan.
Disclaimer: Since this is not a test of various AV software but instead a look at the basic backup failure issue no other AV products where tested. Also, it should be mentioned that a single test file is not all-inclusive of a real-world environment.
So how did the Virus get on my computer?
I took advantage of the fact that initially after first installing Windows there no real virus protection. Knowing this I intentionally downloaded a known virus test file. I also repeated the download of the same file with ‘Real Time Protection’ disabled.
Knowing that a user might not perform a full system scan immediately after installing Microsoft’s Security Essentials, Symantec’s NIS 2011, Kaspersky or any other AV software product, and that a backup may be run or scheduled to run before any AV scan commences I was able to easily create the failure of the backup to complete when using Security Essentials.
Conclusion:
The best solution is to manually run or schedule a “Full” system scan, set your AV software to “Delete” the infected file and not quarantine it. Then run Windows 7’s Backup and Restore.
Note that other Image Backup products may not be impacted by the presence of an infected file as they generally only create an Image of your hard drive whereas Backup and Restore also creates a separate file by file backup of your documents.