
A step-by-step guide on how to replace your existing Windows 7 hard drive with a larger hard drive.
The available space on a new drive is typically unallocated, has no partitions and is unformatted. Your existing drive however will have at least one but more likely a least two partitions both formatted as NTFS.
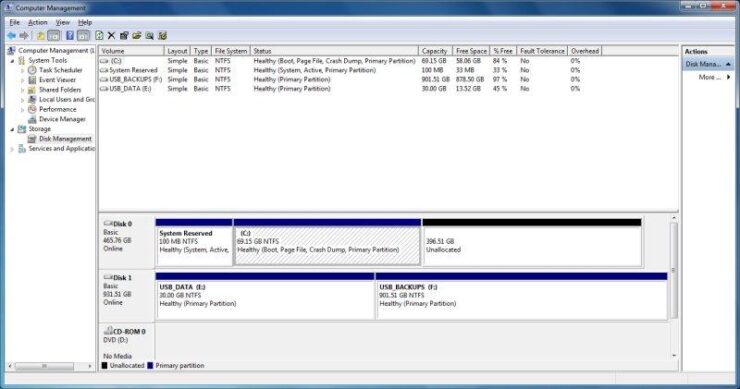
The first of the two partitions (100MB in size) is hidden, has no drive letter assigned and is identified as the ‘System Reserved’ (System, Active) when viewing the drive’s characteristics using the ‘Disk Management’ utility. The second partition is the Windows 7 partition and is the ‘Boot’ partition.
The small hidden ‘System, Reserved’ partition serves as the BCD store (Boot Configuration Data) and Windows needs to access the information contained in this partition to boot and load properly. So it is imperative that any move to a new hard drive not only includes the Windows 7 partition but also the 100MB ‘System, Reserved’ partition which must be the first partition on the new drive.
Note: If you originally installed Windows 7 on a drive that was already partitioned and formatted then there is a possibility that your drive only has a single partition (C:) which serves as both the ‘System’, ‘Active’ and ‘Boot’ partition.
Methods you can try
Typically there are two methods used to move from an older/smaller drive to a new and larger drive:
The first is ‘Drive Cloning’ and the second is ‘Drive Imaging’. Disk cloning software may not be aware of the hidden partition and as a result only clone the Windows 7 partition, leaving you with an unbootable hard drive. Disk imaging will create an image of both partitions and restore both to the new hard drive.
Note: Prior to moving Windows 7 from the 80GB drive to the 500GB drive I downloaded and ran Western Digital’s Data LifeGuard Diagnostics “Extended Test” option on the new drive. Other drive manufacturers such as Seagate also offer to drive diagnostic software. This will validate the integrity of the drive including a check for bad sectors without the need to partition and format the drive prior to use. I could have used the new drive straight out of the box but I wanted to be certain that the image backup and subsequent restore was not influenced by a defective hard drive.
Configuration:
- Windows 7 Professional 32-Bit installed on an 80GB Internal Western Digital Hard drive
- 3GB of Memory
- 1TB Hitachi USB drive used as the backup destination
- A new unopened 500GB Western Digital drive is to be used as the replacement for the original and smaller drive currently installed in my computer
Step-by-step guide on how to restore Windows to your new hard drive:
Windows 7’s Backup and Restore, It’s free but the documentation leaves a lot to be desired.
1) Create a System Image backup to the USB drive. When prompted to create a ‘System Repair’ disk, do so.
2) Shut down the computer and remove the hard drive power and SATA connectors from your original Windows 7 hard drive and any additional internal hard drives.
3) Connect the power and SATA connector to the new hard drive. At this point, this should be your only internal hard drive connected to the computer’s motherboard.
4) Boot from the ‘System Repair’ disc.
5) Verify the keyboard input method and click ‘Next’.
6) Select the ‘Restore your computer using a system image that you created’ option located in the lower left and click ‘Next’.
7) A scan for system images that are on your USB drive will begin. At the completion of the scan, you will have the option to ‘Use the latest available system image’ or ‘Select a system image’. Choose the recommended option and use the latest available system image and click ‘Next’.
8) Choose additional restore options: Note: The ‘Format and repartition disks’ option will be check marked but disabled/grayed out. Click ‘Next’.
9) The ‘Your computer will be restored from the following system image:’ information will be displayed. Click ‘Finish’.
10) Re-image Your Computer prompt. You will now see a pop-up with the following message: All data to be restored will be formatted and replaced with the layout and data in the system image. Are you sure you want to continue? Click ‘Yes’.
11) Windows will now start restoring the image to the new hard drive.
12) At the completion of the image restoration your computer will reboot, sit back and wait for Windows to start and then log on as you normally do, then remove the System Repair disc.
13) You may be prompted to restart the computer to apply changes. Restart the computer.
Summary:
At this point the process of moving Windows 7 from your old drive to your new and possibly larger drive would appear to be successful. However, there are still a few tasks remaining, especially if your new drive is larger than the original drive, in which case you will need to complete Task #1 below to resize/expand the Windows partition to take advantage of the extra drive space.
Task #1: Expanding the size of the Windows partition:
As you can see the image restoration did not change the size of the Windows 7 partition and as a result, there is a large portion of your new drive shown as ‘Unallocated’.
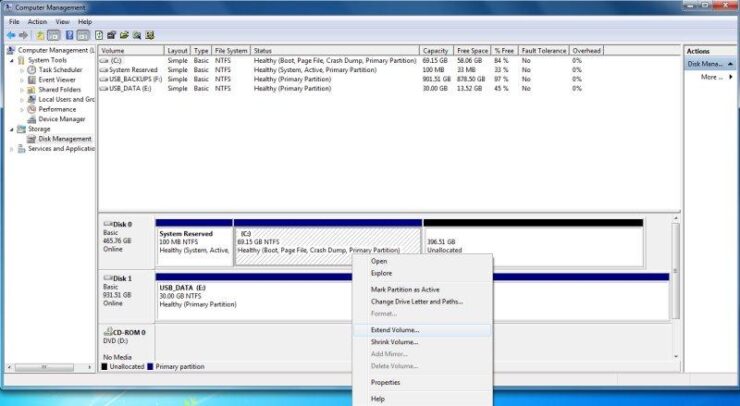
1) To increase the size of the Windows 7 partition open ‘Disk Management’, right-click on the C: (Windows) partition and choose the ‘Extend Volume’ option.
2) The Extend Volume Wizard will now walk you through the steps necessary to increase the size of your Windows 7 partition. Click ‘Next’.
3) By default (as shown below) the ‘Select the amount of space in MB’ value will equal the entire amount of unallocated space available on the drive.
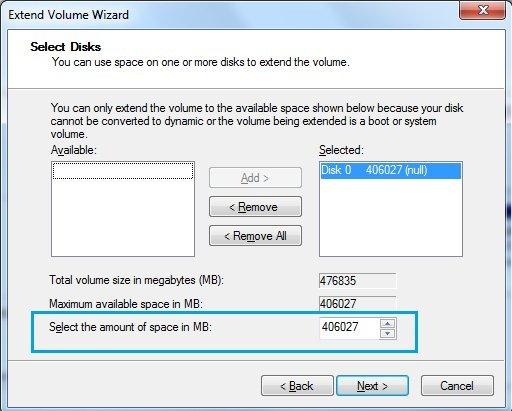
Note: Disk Management displays the unallocated space as a decimal value. The Extend Volume Wizard shows the space in binary notation. Whoever said computers or programmers were logical.
If you have no need to create any additional partitions just click the ‘Next’ button.
4) Verify the settings and click the ‘Finish’ button.
That’s it, your have successfully moved Windows from your original hard drive to the new replacement drive.

Task #2: Verifying the integrity of your newly installed hard drive:
Even after running the hard drive manufacturer’s diagnostic utility as an added measure of safety, it is recommended that you check the Windows partition by running chkdsk as follows.
Start/All Programs/Accessories/ right click on ‘Command Prompt’ and select ‘Run as administrator’. Click ‘Yes’ and then and then at the command prompt enter the chkdsk command as shown below.
chkdsk /f /r then press the enter key.
You will be notified the volume is in use, so schedule the volume to be checked the next time the computer restarts. Enter the letter Y.
Restart your computer and monitor the results during each stage chkdsk. Stage 5 will take the longest.
Another utility: SpeedFan has an online health analysis feature (SMART tab) for hard drives. It will show how your drive compares with other drives of the same make and model.
http://www.almico.com/speedfan.php
Task #3: Create a new Image backup:
If the size of your Windows 7 partition has increased, it’s best to create another backup. Don’t overwrite your previous (original Backup) but create a new System Image backup that reflects both the new hard size and any additional partitions you may have created.
Task #4: Rerun the Windows performance assessment:
Since the only thing that has changed is the drive, Windows will only rerun the drive assessment. You should see an improvement in the score assuming a replacement drive is a higher-performance unit.
Task #5: Set aside your old drive for a few weeks:
Wait until you are satisfied everything functions properly before you use the old drive for other purposes. A small percentage of all new hard drives can fail within the first few weeks of use. This is known as a baby failure.
Therefore your failsafe plan is to keep your old drive “as is” should it be needed. This will be your fallback and keep you up and running until the manufacturer can send you a replacement if your new drive should fail prematurely.
Task 6: If you plan to use the old drive as a second drive in your computer:
Warning: Do not attempt to format the old drive by simply connecting it to your computer while the drive still has Windows 7 installed as you will have two drives with Windows 7 installed and booting to the correct or either drive could be a problem.
Disconnect your new hard drive, connect the old drive and use either one of the three methods below to format the drive.
1) Boot from your original Windows 7 DVD and use it to delete the existing two partitions.
2) Use the drive manufactures diagnostic bootable CD to wipe the drive.
3) Third-party drive partitioning software such as Partition Wizard Home Edition:
http://www.partitionwizard.com/free-partition-manager.html
Some of the features and Functions include: Create partition, Delete partition and Format partition.
4) Now with both drive connected use ‘Disk Management’ to partition and format your old drive.
Conclusion:
Using Windows 7’s built-in Backup and Restore was relatively easy both when creating and storing the image backup to an external USB drive. Restoration of the image to the new drive was even easier with no unpleasant surprises.
The only minor drawback is the inability to automatically expand the Windows partition to take advantage of a larger hard drive, forcing the use of Disk Management’s partition ‘Extend Volume’ option which was only a minor inconvenience.
Read Also: How to Fix Error Code: 0x81000037 When Using Backup and Restore